Posts

My ring doesn't fit anymore!

Image
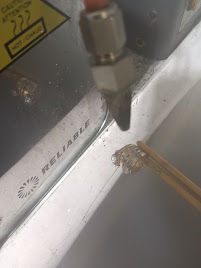
 "My ring doesn't fit anymore. Can you help me?" Well its funny you asked, because I was just in the process of writing a blog about that very subject! After sizing thousands of rings over the course of 40 plus years I've developed a method. Here it is. First the rings are inspected for loose stones and any worn prongs. Certain stones such as emeralds, pearls, tanzanite, opal, and generally anything green can't take the heat required to size a ring. They have to be removed or protected first. Diamonds can take great heat but have to be cleaned thoroughly to remove soap and other grunge or it can get baked on the back of them in the next process.. Here I am cleaning diamonds with a steam cleaner. In the next process I heat the shank or bottom of the ring. This will reveal any previous sizing seams. I usually remove the old section of sizing stock and replace it with one larger one, to prevent the ring from having more than one set of seams, which would weaken it. T

Bench Works

Image
 I decided to ring in 2024 with a few blog posts describing the techniques I use to create and repair jewelry (and other things). As I look out at the landscape I see fewer and fewer craftspeople that acually use the methods my Dad taught me. There are very few schools anymore that train in the jewelry arts. A customer recently asked me to make a ring that would hold his wife's sorority pin safely and securely but  which could be removed and worn as a  pin also. I decided to carve the ring out of a wax blank. The pin's locking mechanism has to be accessible, and working in 3 dimension helped me to visualize and experiment with tolerences. (in other words I was winging it a little) The nice thing about working with wax is that you can add and subtract on the fly. You can't do that as easily with gold or silver.  The above picture shows the wax blank I begin with. The picture below shows the rough wax model sprued and ready for casting. The wedged shaped wooden "shelf&qu

Hybrids

Image
 Making jewelry is a very labor intensive process. You have to be passionate about your craft or you'll get caught up in the time vs. money conundrum. I've been there, and so had my Dad, I'm certain, from time to time. Projects like this diamond pendant enhancer set with baguettes eat time. My Dad realized the survival of his jewelry business depended on the new technology of Cad-Cam, or Computer aided Designing-Computer aided Manufacturing. In 2007, with the help of my brother Steve, we managed to get a computer program for jewelry design. By then my Dad was in his mid-seventies, and had little desire to learn a complicated computer program.  I never had much interest in the computer, but I did have an interest in keeping my job. So I learned the program quickly, and learned a lot about the computer in general. Our first jewelry projects were learning experiences, but I could see the potential. So could my Dad We began incorporating parts of cad-cam with traditional method

Old School Meets New School

Image
  This was one of the last rings my Dad designed and rendered. A couple had bought their original engagement ring and wedding bands from my Dad when they were younger, and had developed a good relationship with him over the years. In 2014 they decided to celebrate their marriage by purchasing a significantly larger diamond than they could afford 30 years before. They wanted my Dad to design a ring that would be easy to wear, but beautiful as well. My Dad came up with this design and asked me to complete it using a jewelry designing program on the computer.  I finished the mounting and set the diamond. Around this time my Dad got very sick, and eventually had several major surgeries in the course of a week. At a point in time my wife and I thought my Dad wouldn't make it...but he did. And went on to work for several more years. He was 83 at the time. This ring is a perfect example of what my Dad and I thought was the Inlow Designs aesthetic. Clean, uncluttered, easy to look at. The

Making Jewelry into Memories

Image
 This is a pencil drawing of the last ring from the previous post. My Dad would start with a drawing like this. Then he would put a piece of "Vellum" or heavy tracing paper over it and paint the Vellum using watercolors. The Vellum has the perfect surface for the detailed painting. The wedding band at the top is one of several designs my Dad made for a couple about 30 years ago,  The couple was very involved in the design process because they wanted bands that expressed their personal tastes and aesthetics. They decided to go with the design on her finger. Its two tone with yellow gold on the outside and white gold in the center.  A few years ago the husband asked me to design a pendant that matched the wedding ring for their 30th anniversary.  That is something I love about being involved in jewelry design. We're not just custom making jewelry, we're actually helping people to express themselves and who they are through the jewelry they wear.  I'll end this post